Improve Elasticsearch Relevance Using Text Embeddings and kNN-Search: A Comprehensive Guide to Semantic Search Optimization
In this guide we will: walk through the major components of Semantic Search, get started with Elasticsearch using dense vectors, and take the next steps for stepping up your search functionality.

Whether you want to create the next ChatGPT, test out your new NLP, or increase the relevancy and usability of your current search product - it all boils down to text embedding and vector searches. In this guide we will: walk through the major components of Semantic Search, get started with Elasticsearch using dense vectors, and take the next steps for stepping up your search functionality. This is a powerful tool, we're not just arguing over semantics here.
Enough Preamble, let's get started!
We'll operate under a few assumptions:
- You're using the most recent version of Elasticsearch as of the time of this writing, version 8.9.0.
- You have at least a Platinum-level subscription to Elasticsearch, as this grants you the power to perform all sorts of Semantic Search-related functions. This is not strictly required, but it makes things a ton easier. Hint - Use this command in your Kibana console for a free 30-day trial of Elasticsearch's highest tier:
POST /_license/start_trial - You have at least a 1 node setup (plus Kibana) running. For this guide everything will be run through Docker, but there are only a few small changes if you choose not to use Docker.
We will also be running all of this locally, so certain configurations might change if you have Elasticsearch running on the cloud. Don't worry, we'll point out where you'll need to edit a line or two.
Quick Review of the Basics
Let's review a few terms to get us started:
Syntax Search - This is the classic search archetype. A keyword or phrase is entered, and a score is calculated based on the term frequency (the "TF" in "TF/IDF") in the body of the text if that keyword exists. This is great if you know the exact keyword or phrase you're looking for, or for filtering out documents containing specific words or values. But, what if you don't know exactly what you're looking for? Well, there are ways with basic syntax search to help: like utilizing synonyms or using varying levels of fuzziness. However, these are relatively clumsy approaches. Instead, let's take a look at Semantic Search for a more elegant solution.
Semantics - "the meaning of a word, phrase, sentence, or text" - dealing with the user's intent. People many times have some idea of what they're looking for, but putting it into exact words can be tough. Semantic Search allows us to interpret the intentions and meaning of words in a given context. This is wildly helpful in serving the best results to your users or aiding your chat-bot in understanding your questions better.
Text Embedding - We know that words have meaning, but how do machines know? As with all things computers, these meanings are translated into numbers, specifically into a vector of numbers. Some quick math - a vector is a mathematical object composed of a direction and a magnitude. For similarity search, we mostly care about the directional aspect, as this allows us to compare the angles between two or more vectors.
Step One: Choose Your Embeddings Model
There are many options out there: subscription-based and free. You can also create your own LLM fine-tuned to your data and upload that, but for this exercise we will be using an open-source model from Hugging Face: The all-MiniLM-L6-v2 sentence transformer. Sentence Transformers are great at capturing meaning, as embeddings are created at the word (token) level; not at the sentence level. This creates a larger, more densely packed embedding which is able to better understand the context of a token, and therefore meaning, within its surrounding sentence. This specific transformer takes words and phrases as inputs and outputs a 384-dimensional dense vector space array. This model was primarily trained off of Reddit data, making it a great choice for real human-created NLP operations. There are hundreds of models to choose from, so playing around with different ones could be seriously beneficial. Just double-check that your preferred model is supported and that the number of dimensions does not exceed Elasticsearch's current maximum of 1024.
Step Two: Load Your Model
Here we will use the Eland Python client to load the model into our cluster.
-
Clone the eland git repo
-
Navigate to the root dir and build the Docker image by using the following command:
docker build -t elastic/eland . -
Run the following command:
docker run -it --rm --network host elastic/eland eland_import_hub_model --url https://host.docker.internal:9200 --hub-model-id sentence-transformers/all-MiniLM-L6-v2 --task-type text_embedding -u elastic -p NotARealPassword --startThis command runs the previously built image and calls the eland_import_hub process.
--url: refers to your cluster URL, and the ML node running on it. Since we're running this locally, it refers to our localhost:9200 node. Place the URL of your node with the [ml] role. Note that you can also use --cloud-id if you have that handy.--hub-model-id: This refers to the LLM we want to import and load into our cluster. You can grab the model's id from Hugging Face's site.-task-type: text_embedding, as we are utilizing text -> vector embeddings!--u and --p: The username and password to your cluster (What you sign in to Kibana with)--start: This runs the task.Optionally, you may need to use the
--insecureparameter if you're using self-signed certificates. Note that this should only be used if you're running this locally. Never bypass TLS/SSL on prod! -
You should see some loading bars, indicating the model is being downloaded.
Once the model has been imported into your cluster, you should see a message like this:
Step Three: Use Your Model
Head on over to Kibana's Dev Tools and run:
GET _ml/trained_models/_all
You should now see two models. The first will be Elasticsearch's default Language Identifier model, but more importantly to us, you should see our newly deployed LLM:

Note the model_id - We will be referencing this later.
Let's now create our NLP pipeline. This pipeline will take an input: text_field which is just plain text, and translates the words/phrases into a text-embedded dense vector field.
 PUT _ingest/pipeline/text-embeddings
 {
  "description": "Gigasearch NLP Pipeline - minilm",
  "processors": [
       {
          "inference": {
              "model_id": "sentence-transformers__all-minilm-l6-v2",
              "target_field": "text_embedding",
              "field_map": {
                  "text": "text_field"
             }
       }
    }
  ]
}
Where model_id is your previously deployed model's id, and target_field refers to the field in our (soon-to-be) created index.
Now that our pipeline has been created, let's create our index!
Run:
PUT my-basic-vector-index
{
  "settings": {
    "index.default_pipeline": "text-embeddings"
  },
  "mappings": {
    "properties": {
      "text_embedding.predicted_value": {
        "type": "dense_vector",
        "dims": 384,
        "index": true,
        "similarity": "cosine"
      },
      "text": {
        "type": "text"
      },
      "submitted_date": {
        "type": "date",
        "format": "yyyy-MM-dd'T'HH:mm:ss'Z'"
      },
      "submission_type":{
        "type": "text"
      }
    }
  }
}
We've set the index's default pipeline to our text embedding one, powered by our sentence transformer model.
We define some fields, notably the text_embedding field with thepredicted_value subfield.
It is of type dense_vector and dims refers to the number of dimensions of the dense vector. Here we match the dimensions of our model's output: 384.
We also set index to "true" so we can search it in our inverted index, and set the similarity function to "cosine". Click here to learn more about the different ways to compare vector spaces.
Lastly, we define some auxiliary fields that won't be processed through our NLP pipeline. These fields will showcase "hybrid" searching (the combination of both Syntax and Semantic search.
Now that our model has been loaded, the pipeline created, and the index up and running - let's import just a few test documents.
POST my-basic-vector-index/_doc
{
  "text_field":"Hey how have you been!",
  "submitted_date":"2023-08-27T00:00:00Z"
}
Note that text_field aligns with the field_map parameter in our pipeline above. Elastic will yell at you if the fields don't match!
We created a bunch of different documents with different phrases and submitted_date values as well. The phrases we chose mostly consisted of both greetings (Hey how have you been!) to parting phrases (I will talk to you later)
Now that we have a few test documents, let's craft our query.
GET my-basic-vector-index/_search
{
  "knn": {
    "field": "text_embedding.predicted_value",
    "query_vector_builder": {
      "text_embedding": {
        "model_id": "sentence-transformers__all-minilm-l6-v2",
        "model_text": "greetings"
      }
    },
    "k": 10,
    "num_candidates": 10,
    "filter": {
      "range": {
        "submitted_date": {
          "gte": "2023-08-26T00:00:00Z",
          "lte": "2023-08-28T23:00:00Z"
        }
      }
    }
  },
  "_source": [
    "id",
    "text_field",
    "submitted_date"
  ]
}
Here we are hitting the basic search API, but adding a knn clause against our text_embedding.predicted_value field.
The query_vector_builder translates the phrase in the model_text field using the same model (defined in model_id) into a dense vector itself. We need an apples-to-apples comparison, hence we need to translate our phrase into a similar 384-dimensional dense-vector. Alternatively, you could translate your phrase into a 384-dimensional dense-vector on your own, and pass that vector as a parameter yourself. But using the vector builder is much simpler for this exercise. Note that the phrase in the model_text field we are searching for is "greetings" in this example. We are looking for the best results that capture the meaning/intent of a greeting, even if the word greeting occurs nowhere in the text.
num_candidates determines how many possible k-best options there are. Increasing this number will increase the accuracy of the results, but at a considerable performance hit.
k determines the number of similar results to return. Basically, the goal of kNN-search is to find the k-closest results within num_candidates amount of potentials.
filter applies a normal filter with a leaf range clause. This filter could be any form of query - here we apply a typical range filter on the submitted_date field we defined in our index.
Below are the results - note the word "greetings" appears exactly 0 times in any top-result, but the top results are similar in meaning to a greeting.
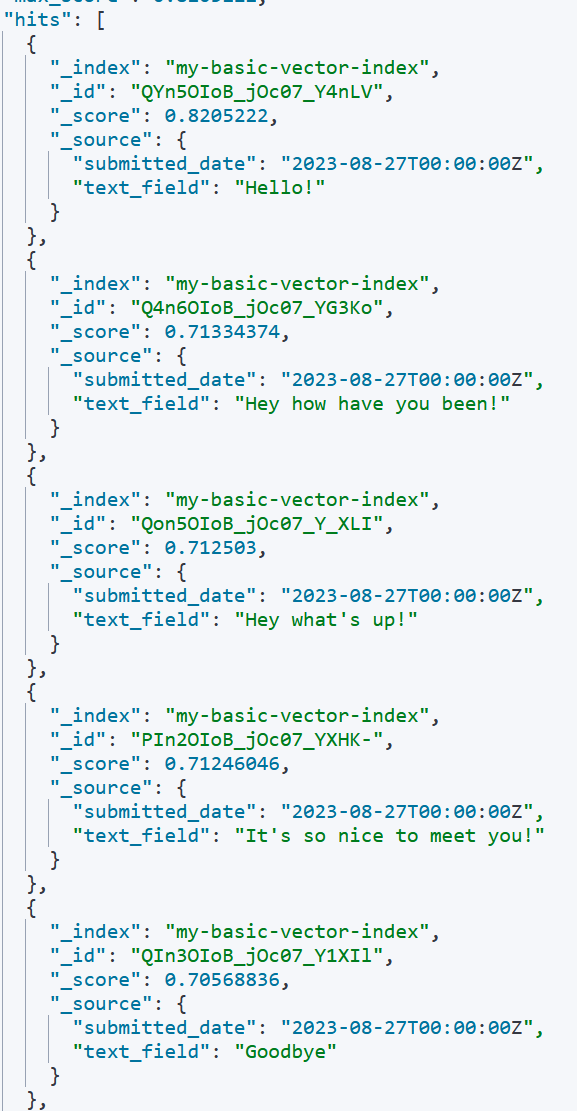
Note that "Goodbye" appeared at the bottom of the results. It is important to verify the results because while the general trend may be "greetings", this is not a boolean question of whether the keyword exists or not. Results can vary. "Goodbye" showing up is mostly like a consequence of only having ~20 or so records total. Using a healthy data set, as well as trying different models or similarity functions, can really help. Truncating lower scored results may also aid in making sure no false positives get through.
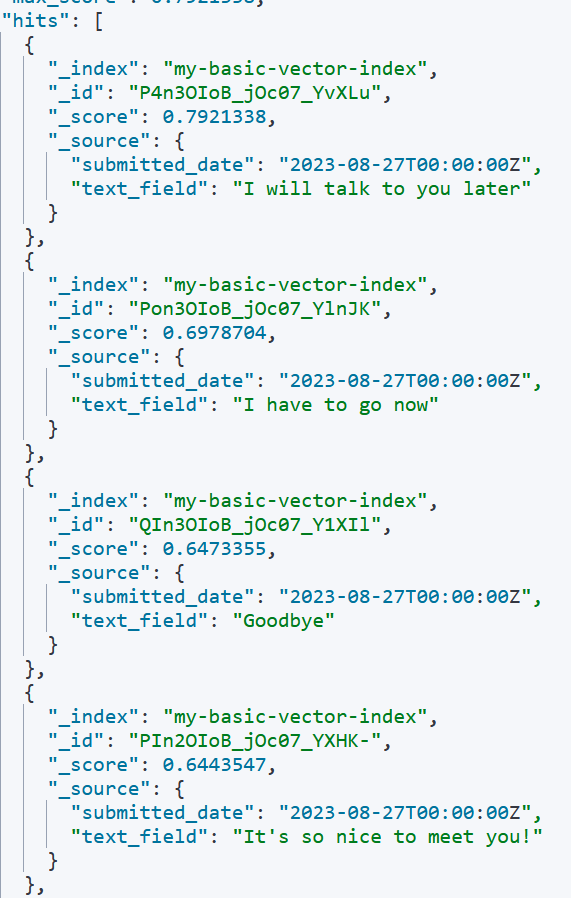
Now we'll do a similar query but for the model_text of "parting words". Here are the results:
Great Work!
Finally, we will apply a normal query atop of our kNN search, to form a hybrid search!
GET my-basic-vector-index/_search
{
  "query": {
    "match": {
      "text_field": "Welcome"
    }
  },
  "knn": {
    "field": "text_embedding.predicted_value",
    "query_vector_builder": {
      "text_embedding": {
        "model_id": "sentence-transformers__all-minilm-l6-v2",
        "model_text": "greetings"
      }
    },
    "k": 10,
    "num_candidates": 10,
    "filter": {
      "range": {
        "submitted_date": {
          "gte": "2023-08-26T00:00:00Z",
          "lte": "2023-08-28T23:00:00Z"
        }
      }
    }
  },
  "_source": [
    "id",
    "text_field",
    "submitted_date"
  ]
}
Note how we are now performing a normal query on text_field for the word "Welcome". Any result with the word "Welcome" in it should be ranked higher.
The results are as such:
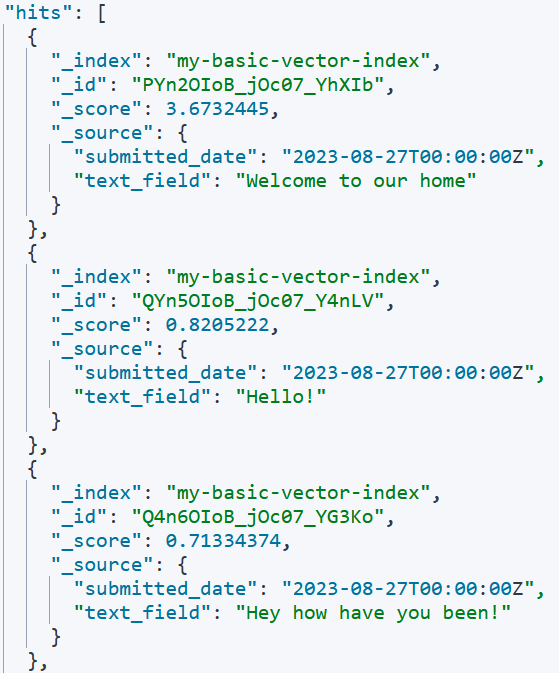
With a blend of "greetings" from the kNN search, and "welcome" from the match query - the result with "welcome" is pushed to the top!
Wrapping Up
Hopefully, this has been an enlightening crash course on the basics of text embedding, dense vectors, and Semantic Search using kNN. Some concluding considerations:
- Make sure to have enough memory to hold all of your vector data in memory.
num_vectors * 4 * (num_dimensions + 12)is the equation for calculating a rough estimate of total memory needed specifically for vector data. - Note that the required RAM is for the filesystem cache, which is separate from the Java heap - . Also, you can sacrifice accuracy for lesser memory requirements by using Byte Encoding instead of Floats (1 Byte per vector as opposed to 4 Bytes). - The above kNN approaches use the "approximate" search, which is the most optimized form. You could use a script_score with a vector function to perform an Exact Search - at the cost of a massive performance hit.
- Make sure to verify your top results. With kNN there is no perfect match, there is just a spectrum of matches. Training your model, truncating off bad results, and taking user-input to re-score your documents is not optional for good results, it's necessary.
- Make sure to play around with different models.
- Experiment with different similarity functions.
- Experiment with different datasets.
- It is important to have a good framework for evaluating how changes impact the relevance results. Reach out to us at Gigasearch if you’re unsure of how to set this up.
- Just play around with it in general! Elasticsearch was already a ton of fun, but adding on Semantic Search really opens up the possibilities. Seriously, have fun!
If you’d like support in setting up semantic search for production, contact us at Gigasearch!